


Introduction
Many people have never thought about scanning and tagging their old family photos – until those family photos are gone. It’s a shame, especially when the process to preserve precious family memories is rewarding and relatively easy. Yes, it takes time, but that investment will be paid back a hundred times over when you are able to share the results with your friends and family members.
This article describes a workflow that will help you get started on your first photo archiving project, or restart an existing project.
Hardware and software mentioned in this article:
- Visioneer 7800 scanner (USB device)
- Capture Tool (desktop)
- AdvancedRenamer (desktop)
- Tag That Photo *** (desktop)
- PicWish (cloud)
- Jalbum (desktop)
- Picsart (cloud)
- ShapeCollage (desktop)
- PhotoScape (desktop)
Advances in artificial intelligence (AI) have made it easy to clean up old images and get great results. Advanced face recognition AI has greatly reduced the time it takes to tag people in photos. The latest manufacturing technology has put high-quality Visioneer scanners within reach for any family with a home computer. There has never been a better time to tackle a photo archiving project!
*** Visioneer 7800 and 7900 scanners come with a one-year subscription to Tag That Photo. They are available to buy on Amazon.

Overview of the Main Steps
The steps we describe below will produce a nice, clean set of tagged digital images. We also describe some ways to share the results with friends and family to maximize enjoyment. Once you have the digital images, the options for sharing are limitless!
- First, we need to locate the old photos that we want to capture and archive.
- With the physical photos in hand, we can scan them using the Visioneer scanner to convert them to digital images.
- Old photos will typically need to be cropped, edited, and cleaned up so that we capture the best possible representation in digital form.
- Much like the dates and names scribbled onto the back of old photographs, tagging the photos using Tag That Photo will embed this information (known as metadata) into our images.
- Share these newly scanned photos with family and friends. Smile, knowing generations to come will be able to revisit cherished memories.
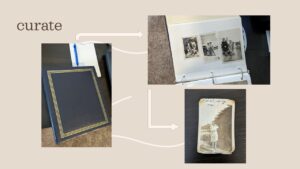
Curate
Finding old photos may require reaching out to family members. Be prepared to receive them in all kinds of formats – some in albums, nicely labeled (clearly a family with a photo organizer in their midst), or they could be in envelopes, old file folders, shoe boxes, or plastic bags. Some may be well preserved, while others will be a bit worse for wear. Have no worries, today’s software tools can make those damaged images come to life with little technical expertise or effort.
When starting, it’s best to remove the photos from any protector sheets to avoid glare during scanning. Some may require an overnight stay in a heavy book to flatten curled corners.
When browsing old images, we recommend observing the following guidelines:
- Avoid scenery shots (without people) unless the memory is super important like your family home or first car.
- Try to choose photos where faces are clearly visible. They don’t all have to be smiling though – many folks in older photos were told not to smile.
- Focus on photos that include relatively close family members and/or family friends.
- Strong shadows, really blurry images, and other similar shots should be avoided. Although if an image meets the other criteria, the latest artificial intelligence software for cleaning up the appearance is really good, so try working with a couple and experiment.
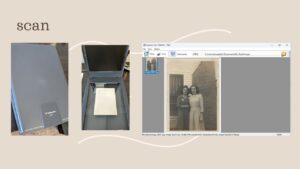
Scan
Scanning the physical photos is the next step. The Visioneer 7800 or 7900 are excellent devices to perform this task. Features include:
- Scan up to 1200 dpi
- Multiple Image Cropping – Scan multiple photos on the flatbed and each photo will be cropped
- Auto color detection
- The Visioneer 7800 (V7800-TPS) is USB powered. Use the included USB 2.0 cable to send images to your PC or laptop. 7 seconds per full scan.
- The Visioneer 7900 (V7900-TPS) requires plugging into a common 110V wall outlet. It is less portable however the scanner performs much faster. 1.5 seconds per full scan.
With the Visioneer driver and Capture Tool software installed you are ready to go. We suggest you scan to JPEG format since JPEG allows for embedding of the metadata. Metadata includes dates, descriptions, faces, and names that are embedded (stored) directly in the image. Metadata will be added during the “tagging” step.
We suggest setting the scanner at a minimum resolution of 300 dpi (dots per inch) and full color to get a high-quality digital image. Make sure the scanner’s glass surface is clean with no finger smudges. Eyeglass cleaning cloths or wipes are a good thing to keep nearby.
Depending on the size of the photos being scanned, you can scan images one at a time, or place multiple images on the flatbed scanner. If scanning multiple images, the Capture Tool app will automatically detect and split multiple images into separate image files. If you have a large project, that is a good strategy to save time.
We suggest you create folders for your project that follow the phases of your project. We used the following folder names – cropped, cleaned, and tagged. We also recommend you establish a naming convention for the images. For example:
<your project title>_cropped_<number>.jpg
<your project title>_cleaned_<number>.jpg
<your project title>_tagged_<number>.jpg
Where <number> is a sequence like 0001, 0002, etc.
There is a free software utility called Advancedrenamer that makes it easy to copy and rename your images from one folder to the next when you finish each step.

Crop and Clean
The process of cropping, editing, and cleaning up old images is one of the most time-consuming tasks in a scanning project. With AI tools, the results you can achieve with a few minutes of effort per photo are no less than amazing.
For our project, we cropped the scanned images using Microsoft Photos. The next step was to perform the clean-up. Most photo editors offer basic color correction and lighting enhancement options. What’s new in the last year is the ability to remove objects, reduce blurriness, colorize black and white images, remove backgrounds, and improve facial clarity.
Some images that are really damaged may require multiple steps with different tools that specialize in specific areas of correction. In our case, we used the PicWish Photo Enhancer cloud-based solution to do basic image clean-up. PicWish also offers a desktop option for bulk uploading of images. As seen on the screenshot – above and on the right – the PicWish user interface presents a slider to see the before and after view. Getting this type of result would have been very labor intensive in the past, even with state-of-art photo editors like Adobe Photoshop.
Once cropped, you can import the images from the “cropped” folder to whatever software or cloud tool you choose. After the enhancements are done, you’ll want to save and rename them to the “cleaned” folder. Once you are satisfied with the results from this step of the project, copy the images to the tagged folder and rename them.
Tag
Tagging is the final step in your journey to create a permanent digital copy of your photo memories for future generations to enjoy.
You may want to have the original physical photos nearby should there be information written on them. In some cases, you won’t have much information. Simply record what you can as image “metadata” in this step.
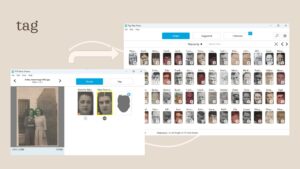
Tag That Photo (TTP) employs world-class face recognition technology to enable you to find and tag the faces in your photos quickly. It then embeds the names and other metadata directly into the images using industry-standard formats that will preserve the data far into the future.
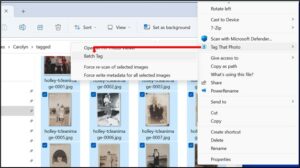
Adding the “tagged” folder to Tag That Photo will initiate a scan for faces in the images. Those faces will initially appear as Unknown faces. There are two ways to tag, and there is no problem flipping back and forth between the two main methods. If you have a lot of data to add in addition to the names of faces, we suggest you begin by opening the images in the Photo Viewer.
Open Photo Viewer via Windows Explorer, select 50 photos at a time, right-click, and choosing the “Batch Tag” option from the Tag That Photo sub-menu. Refer to the screenshot below:
Selecting that option will open the selected images in the TTP Photo Viewer:
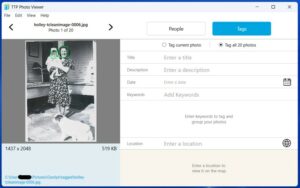
You can see the options to enter titles, descriptions, dates, keywords and location data. If you know that a group of photos was taken at a specific event, you should select only those photos from Windows Explorer so that you can apply the location, date, and descriptive information in one data entry operation for the entire group of photos.
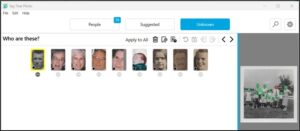
Once you have applied any metadata to the entire batch of images, scroll through the images one at a time and tag the faces. In other words, put names to each face. Select the People tab for doing this. For group shots, where there are a lot of background faces, or for images where you are only interested in tagging a handful of people, go ahead and tag the faces you know. Then you can delete all the remaining faces with the keyboard command CTRL-D or CTRL-DEL.
If you don’t have metadata for the images, but recognize faces yourself, or alternatively, have someone in-person who recognizes the faces, locations and events, this stage of the project can become an enjoyable and collaborative tagging session. If the other person is remote and has a computer, you could use a screen-sharing tool such as Microsoft Remote Desktop to cooperate on the tagging effort.
Periodically, you can view the faces from the main TTP window. You can name faces by thumbnail from this view. The Suggested tab will show any groups of faces recognized based on tagging you have done via the Photo Viewer. It is quick to confirm any suggested matches with two mouse-clicks.
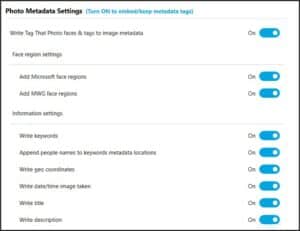
Turning on the metadata writing feature via Settings is important to ensure the metadata is embedded into the JPEG images. As you are tagging, the metadata is written into the images automatically. This setting is shown in the following screenshot:
Once the tagging is completed, you want to be sure all your time and effort isn’t lost. For this reason, be sure to take a backup. It is best to back up the data to a local USB “thumb drive”, as well as a cloud-based service. MS OneDrive, Dropbox, or Google Drive are great alternatives to save that precious data. The metadata is embedded in the images, and as a result is backed up along with the images; however, it is also recommended that you take a backup of the Tag That Photo database via the option offered at the bottom of the Settings page.
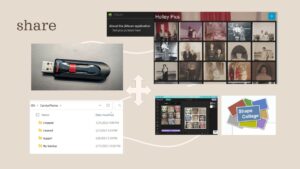
Share
Now comes the fun part – sharing with friends and family.
For selecting photos to be shared, you’ll decide which family and/or friends you want included in the photos. Tag That Photo offers two options. to export face thumbnails for individuals. You can export the main face thumbnail for all people tagged, or you can export all the tagged face thumbnails for each individual. This gives you the choice of working with entire photos or just the cropped faces when producing your creative masterpiece. The options for how you share are endless. Here are a few that we have used ourselves with good results.
Create a Collage
For generating collages, there are numerous options. Picsart is a cloud option that’s easy to use, but limited in the number of faces that can be included in a single collage. As a result, it is good for doing collages with the faces of specific individuals – perhaps to celebrate a special occasion like a birthday. For larger collages with more images, ShapeCollage is a nice alternative. You can produce a collage in the shape of a heart, for example.
Create a GIF
Another fun sharing option is to export the faces for a person and create an animated GIF from those faces. A good desktop software tool for this is PhotoScape. This works especially well where you have a sequence of face thumbnails spanning someone’s life, from infant to adult, for example.
Create a Slideshow
For web-based presentations, one of the best tools available is Jalbum. With Jalbum you can use your Tag That Photo-tagged images to produce an impressive slideshow. Specific “skins” (styles) can be selected that extract the face tags from the embedded metadata and then makes that information available as part of the slideshow. We’ve used Jalbum’s “Tiger” skin with very good results. You can use the Jalbum site to host your slideshow production or, if you have access to your own web-hosting service, use Jalbum to generate the slideshow and then your own site to serve up the results.
Share the digital images
Using a thumbdrive or via a cloud service like Dropbox, you can share the actual digital images with friends and family members. If they also install Tag That Photo, then when they import those images they will have access to all of the tags and metadata you have created.
Wrap-up
We hope you have found this article useful and that it motivates you to embark on your own photo archiving project. With the advanced technology ready to assist you, there has never been a better time to preserve those photo memories.
Feel free to send any feedback, suggestions or comments to: